What is Celery
If you are reading this article, i am assuming you already have used celery once. I will try to clarify it in layman’s terms.
Celery can be taught of another django application or another server or a worker, that is just there to do long running tasks. That’s it, it doesn’t do anything fancy, just some long tasks and storing results to the database.
Why Use Celery?
Imagine visiting a website, clicking on something, and then having to wait 5 minutes for response because the website is calculating the response.
Classic Usecase of Celery:
Lets say we have a website where a user can analyze data. The user clicks a button, the web server now takes 5 minutes to do the calculations, you don’t want the user to wait for 5 minutes to get a response. What you do is, you send the calculation part to celery, send the user a response saying that the task is being processed, and better yet, show them a progress bar ( you will shortly learn how), and let them do their stuff.
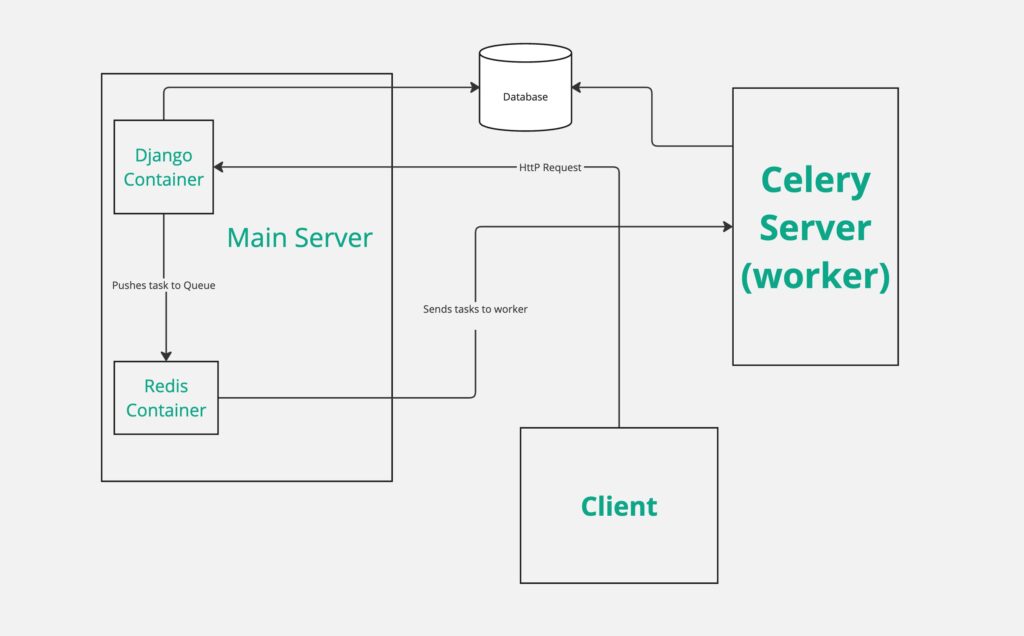
Implementing The Architecture Diagram Above
The Main Server:
Here’s the docker compose file for the main django appilcation. You can see redis and nginx containers in it as well. Redis is used as a queue, and nginx will handle requests.
version: '3'

volumes:
  production_django_media: {}

services:
  django: &django
    build:
      context: .
      dockerfile: ./compose/production/django/Dockerfile

    image: celery_python_production_django
    volumes:
      - production_django_media:/app/celery_python/media
    depends_on:
      - postgres
    env_file:
      - ./.envs/.production/.django
      - ./.envs/.production/.postgres
    command: /start
    restart: unless-stopped


  redis:
    image: docker.io/redis:6
    restart: unless-stopped
    ports:
    - 6379:6379 #Celeryworker will connect to this port


  flower:
    <<: *django
    image: celery_python_production_flower
    command: /start-flower
    restart: unless-stopped
    ports:
    - 5555:5555

  nginx:
    build:
      context: .
      dockerfile: ./compose/production/nginx/Dockerfile
    image: celery_python_local_nginx
    depends_on:
      - django
    volumes:
      - production_django_media:/usr/share/nginx/media:ro
    ports:
    - 5001:80
    restart: unless-stopped
The Celery Worker:
The celery worker will run on a different server. It won’t start a django application, but just start celery. All the django code needs to be on the celery server as well. It will store results and status in the same DB as the main server (usually).
services:
  celeryworker:
    build:
      context : .
      dockerfile : ./compose/worker/django/Dockerfile
    image: celery_worker_1
    command: /start-celeryworker
    restart: unless-stopped
    env_file:
    - ./.envs/.production/.django
    - ./.envs/.production/.worker
As you can see, its just a single docker container, you could run it just with a docker run command, but I like compose files better.
I have used some env files in both the compose files, which I will paste a link to on github.
I also changed the Dockerfile for worker a bit, and put it in a different directory. Its practically the same, except it doesn’t start a django server, and a flower server. Here’s how the Dockerfile for worker looks like:
# define an alias for the specific python version used in this file.
FROM docker.io/python:3.12.3-slim-bookworm as python

# Python build stage
FROM python as python-build-stage

ARG BUILD_ENVIRONMENT=production

# Install apt packages
RUN apt-get update && apt-get install --no-install-recommends -y \
  # dependencies for building Python packages
  build-essential \
  # psycopg dependencies
  libpq-dev

# Requirements are installed here to ensure they will be cached.
COPY ./requirements .

# Create Python Dependency and Sub-Dependency Wheels.
RUN pip wheel --wheel-dir /usr/src/app/wheels  \
  -r ${BUILD_ENVIRONMENT}.txt


# Python 'run' stage
FROM python as python-run-stage

ARG BUILD_ENVIRONMENT=production
ARG APP_HOME=/app

ENV PYTHONUNBUFFERED 1
ENV PYTHONDONTWRITEBYTECODE 1
ENV BUILD_ENV ${BUILD_ENVIRONMENT}

WORKDIR ${APP_HOME}

RUN addgroup --system django \
    && adduser --system --ingroup django django


# Install required system dependencies
RUN apt-get update && apt-get install --no-install-recommends -y \
  # psycopg dependencies
  libpq-dev \
  # Translations dependencies
  gettext \
  # cleaning up unused files
  && apt-get purge -y --auto-remove -o APT::AutoRemove::RecommendsImportant=false \
  && rm -rf /var/lib/apt/lists/*

# All absolute dir copies ignore workdir instruction. All relative dir copies are wrt to the workdir instruction
# copy python dependency wheels from python-build-stage
COPY --from=python-build-stage /usr/src/app/wheels  /wheels/

# use wheels to install python dependencies
RUN pip install --no-cache-dir --no-index --find-links=/wheels/ /wheels/* \
  && rm -rf /wheels/


COPY --chown=django:django ./compose/worker/django/entrypoint /entrypoint
RUN sed -i 's/\r$//g' /entrypoint
RUN chmod +x /entrypoint

COPY --chown=django:django ./compose/worker/django/celery/worker/start /start-celeryworker
RUN sed -i 's/\r$//g' /start-celeryworker
RUN chmod +x /start-celeryworker


# copy application code to WORKDIR
COPY --chown=django:django . ${APP_HOME}

# make django owner of the WORKDIR directory as well.
RUN chown -R django:django ${APP_HOME}

USER django

ENTRYPOINT ["/entrypoint"]
You will also have to copy the entrypoint file to the directory where Dockerfile is located.
And the Dockerfile also looks for a file named ‘start’ in directory ‘./compose/worker/django/celery/worker’ . You either need to copy the celery start file there, or change the directory in Dockerfile.
The celery start file just stars the celery worker, this is how it looks:
#!/bin/bash

set -o errexit
set -o pipefail
set -o nounset


exec celery -A config.celery_app worker -l INFO -n worker2@%h
#### THIS ENV FILE OVERRIDES VARIABLES FOR THE WORKER ##
# PostgreSQL

# ------------------------------------------------------------------------------

DJANGO_DB_HOST=IP Of Main Server e.g 192.168.1.292

DJANGO_DB_PORT=5432 #Port you exposed from DB on main server

DJANGO_DB_NAME=Your_DB_Name

DJANGO_DB_USER=Your_DB_user

DJANGO_DB_PASSWORD=Your_DB_Pass

# Redis

# ------------------------------------------------------------------------------

REDIS_URL=redis://ip_of_main_server:6379/0
With this configuration, your celery will be consuming from the same queue that the main server is working on, and hence you have a distributed system. You could also attach a 2nd worker on another server with the same configuartion.
How does the main server know the status? And the Progress Bar?
I will cover the progress bar in next article, but in short. You should store the state of your task in the Database, since you worker is connected to the DB, you can update the DB during the task execution, and then the main server can query the DB to get the status. This way, a user asking for status can easily get it.
Summary:
We made a distributed system where the long running tasks are sent to another server where they are calculated. The results are stored in DB there, and you can easily check the state of your tasks by querying the database.
What’s Next?
I will soon be writing about how to create a progress bar for the results you are saving. Stay tuned.