Introduction:
Prerequisites (If you are using Django):
- You have Django set up with timescaledb. If you haven’t yet, we have a tutorial for that.
Now that timescaledb is set up. We need to create the database tables (models) for our sensors. We will have 2 models, one for Sensors and other for SensorReadings. The SensorReadings will have a foreign key to the Sensor table (model).
You can just copy and paste the code in your models.py file for now. If you have your own models set up, they might look a little different, but the jest is the same.
class Sensor(models.Model):
    """
    A class/table to store attributes of sensors and methods of sensors.
    """

    name = models.CharField(_("Name"),max_length=100)
    slug = AutoSlugField(_("Slug"),populate_from="name",blank=True,null=True)
    threshold = models.DecimalField(max_digits=9,decimal_places=4,default=50.2)
    alarm_systems = MultiSelectField(_("Methods of alarms"),choices=ALARM_CHOICES)
    enabled = models.BooleanField(default=True)
    unit = models.CharField(_('Unit'),max_length=20)
    sensor_type = models.CharField(_("Type of Sensor"),max_length=100)

    class Meta:
        verbose_name = _("sensor")
        verbose_name_plural = _("sensors")
class SensorReading(TimescaleModel):
    """
    A class to store SensorReading information in to the database table.
    All attributes of table SensorReading are defined here.
    """
    sensor = models.ForeignKey('Sensor', related_name='readings', on_delete=models.CASCADE)
    reading = models.FloatField(help_text="reading from the sensor")


    class Meta:
        verbose_name = _("Sensor Reading")
        verbose_name_plural = _("Sensor Readings")


    def __str__(self):
        return f'{self.reading}'

    def __unicode__(self):
        return self.reading
The Sensor Model:
We have some extra fields like ‘alarm_systems’, ‘sensor_type’ for our own use case. You can put in any fields you want in the Sensor Model, just be sure that they fit your use case.
The SensorReading Model:
SensorReading is the model where the readings will be stored. It inherits TimescaleModel which creates hypertables for timeseries data, more on this in our article here.
Note that the TimescaleModel model is an abstract model, it isn’t imported from anywhere. If you yet haven’t created it, this is how it looks like:
class TimescaleModel(models.Model):
    """
    A helper class for using Timescale within Django, has the TimescaleManager and
    TimescaleDateTimeField already present. This is an abstract class it should
    be inheritted by another class for use.
    """
    time = TimescaleDateTimeField(interval="1 day",default=now)

    objects = TimescaleManager()

    class Meta:
        abstract = True
Now that the models are in place, we makemigrations and then migrate them.
Run the following commands for that:
python manage.py makemigrations
python manage.py migrate
Now that our database is setup. Why not go to the admin panel and see if they work? We will first need to create Sensor, since a reading has Foreign Key to a Sensor, we can’t add a Reading without a Sensor.
Make sure to register your models in admin.py. Then go to your admin page and add data. I won’t show how to do it here because its simple. If you have any difficulties doing this, you can leave a comment.
Using the MQTT Broker to store Sensor Data:
Obviously, we won’t be storing data manually, but we want a sensor to emit data and send it to our application.
For that, we need a ‘broker’ where the sensor sends data, and our django application takes that data from the ‘broker’.
There are many brokers available for this purpose, but we will be using the Mosquitto Broker. It can easily be installed on Linux or other operating systems.
To install Mosquitto broker on Ubuntu, type the command in your terminal with superuser privileges:
sudo apt install -y mosquitto
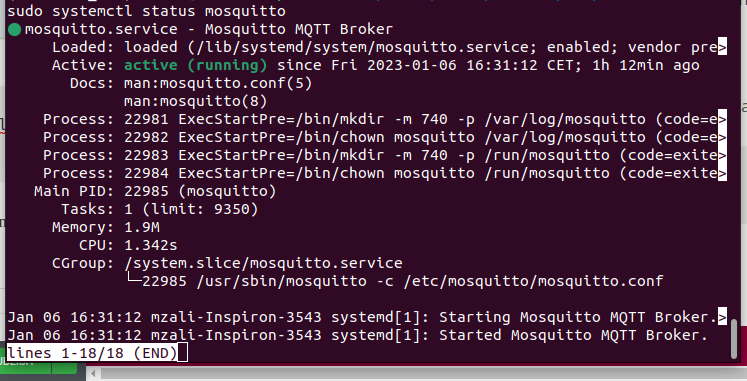
mosquitto broker should now be installed. To check if its up and running, you can run
sudo systemctl status mosquito
You should see something like this:

The mosquitto broker is now running on localhost (127.0.0.1) on port 1880.
Publishing and Consuming data to/from mosquitto broker:
To create a consumer or a ‘fake publisher’, we will need a library named ‘paho-mqtt’. Run the following command to install it:
pip install paho-mqtt
Once paho-mqtt is installed, we can use it to send and receive data from the mosquitto broker. This is how our fake publisher looks like. In real environments, you will have a sensor doing this task i.e sending data to the broker:
import paho.mqtt.client as mqtt
from random import randrange,uniform,random
import math
import time

mqttBroker = "127.0.0.1" #Our mosquitto broker running on 127.0.0.1
client = mqtt.Client() #instantiating the mqtt client.

client.connect(mqttBroker,port=1883) #Connecting mqtt client to broker.
i=0
#The loop just sends random sin values to a topic in broker.
while i < 2000:
    num = math.sin(i) #Sine value of i
    #id = randrange(1,5)
    id=randrange(4,8) #Id of our sensor in backend.
    client.publish(f"SENSOR/{id}",num) #Publish the number to topic 'Sensor/id_of_sensor'
    print(f"Just published {num} to topic SENSOR/{id} with count {i}")
    i = i+1
    time.sleep(0.5)
The code above is self explanatory in code comments. If you are not aware about ‘topics’ in the mqtt brokers.
Here’s some info about ‘topics’ from http://www.steves-internet-guide.com/understanding-mqtt-topics/
- MQTT topics are a form of addressing that allows MQTT clients to share information.
- MQTT Topics are structured in a hierarchy similar to folders and files in a file system using the forward slash ( / )as a delimiter.
- Using this system you can create a user friendly and self descriptive naming structures of you own choosing.
- All topics are created by a subscribing or publishing client, and they are not permanent.
- A topic only exists if a client has subscribed to it, or a broker has a retained or last will messages stored for that topic.
Consuming data from mosquitto broker:
Now that we have a sensor sending data to our broker, we need to get this data in Python/Django, again using the paho mqtt client.
The code, along with comments, is here:
import paho.mqtt.client as mqtt
import requests
import sys
import time


# The callback for when the client receives a CONNACK response from the server.
def on_connect(client, userdata, flags, rc):
    print("Connected with result code "+str(rc))
    topic = 'SENSOR/+'

    # Subscribing in on_connect() means that if we lose the connection and
    # reconnect then subscriptions will be renewed.
    client.subscribe(topic)


# The callback for when a PUBLISH message is received from the server.
def on_message(client, userdata, msg):
    """
    The on_message callback takes 3 arguments:
    1 : client
    2 : userdata
    3 : msg

    The data sent from broker is stored in the 'msg' argument.
    It containes both the 'topic' the data was received from,
    and the payload.

    We parse the topic to get the id of the sensor.
    And we get the payload from msg.payload as well.

    We then send this data to our API.

    You can create a database connection in this file, and instead
    store the data directly in the database, that would be
    preferred in production environments.
    """
    print(msg.topic+" "+str(msg.payload))
    url = "http://localhost:8000/sensors/readings/"
    id = int(msg.topic.split("/")[1])
    print(id)

    data = {
        "sensor" : id,
        "reading" : msg.payload
    }
    requests.post(url,data)


#Connection to the client is established here
client = mqtt.Client()
client.on_connect = on_connect
client.on_message = on_message
client.connect("127.0.0.1",port=1883)
client.loop_forever()
The code is explained a bit in comments. In a nutshell, we connect to the broker in the on_connect method, and then perform some tasks when a message/data is received on the specific topic, in the ‘on_message’ method.
Note that in our ‘publisher’ file, we are sending data to topics ‘Sensor/id’ and in our ‘consumer’ file, we are subscribing to topic ‘Sensor/+’. The ‘+’ means that it can be any character after the ‘/’. So data sent to Sensor/1 by our publisher, will be recieved by the consumer.
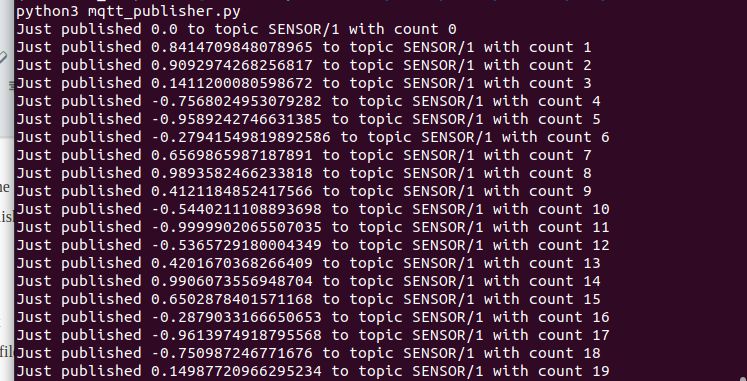
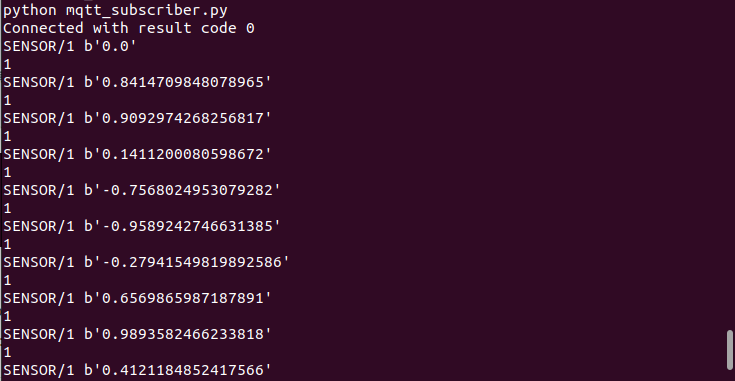
You should run both the consumer and the publisher files in parrallell, in different terminals.
This is the output I get when I run both these files:

And here’s the output from the subscriber/consumer:
Deployment
If you are deploying the architecture to production. Make sure to use something like supervisorctl or systemctl to supervise the ‘consumer’ file. And also to write the data directly to your database, rather than hitting the API, since hitting the API is expensive.
If you don’t know how to do that, please indicate in comments, and I will write about it.


Sorry to reply this late. But if you still have problems, i can help you out.
The consumer should be considered a separate application/file connected to your database. You can run it with supervisor so it is always running and accepting data.
Glad that it helped.
Can you write more about the deployment, specifically “If you are deploying the architecture to production. Make sure to use something like supervisorctl or systemctl to supervise the ‘consumer’ file. And also to write the data directly to your database, rather than hitting the API, since hitting the API is expensive.”. Thank youu
“
Sure. I will write an article about deploying this whole project to production. I will tag you after.